5 Key Elements for a Professional Vocal Mix (and how to use them)
|
|
Time to read 6 min

|
|
Time to read 6 min
As a music creator, a high-quality vocal mix is crucial to creating songs that people will love and connect with!
Fortunately for us, achieving a professional vocal mix has never been easier.
Regardless of what DAW and 3rd-party plug-ins you use, you most likely already have all that you need to create professional-level vocals.
We designed 15 Essential Vocal Chain Presets to help you achieve pro vocals with just a few clicks - these are a perfect starting point for creating your ideal vocal mix.
Here's an in-depth breakdown of the five most important plug-ins for a pro vocal mix.
Chances are that if you've made it this far, you're already using EQ in a few different ways to process your vocals.
But are you currently using it in the best way?
The first (and most crucial) step to EQ'ing your vocals is to remove unnecessary low frequencies with a high-pass filter.
The low-end of your mix is critical for creating music that hits right for your listeners.
By cutting out some low-end in your vocals, you're creating space for your bass, kick drum, and other instruments to fill, while your vocals sit tastefully on top of the mix.
In our experience, it's best to place a high-pass filter around 50-150 Hz, depending on the situation.
To determine the best spot for your high-pass filter, try playing your vocals on loop and starting with the filter's frequency high (~ 200 Hz), then reducing it as you listen.
Once you've gotten the high-pass filter to where your vocals sound full (as opposed to thin) while cutting unwanted bass frequencies, you're in the right spot.
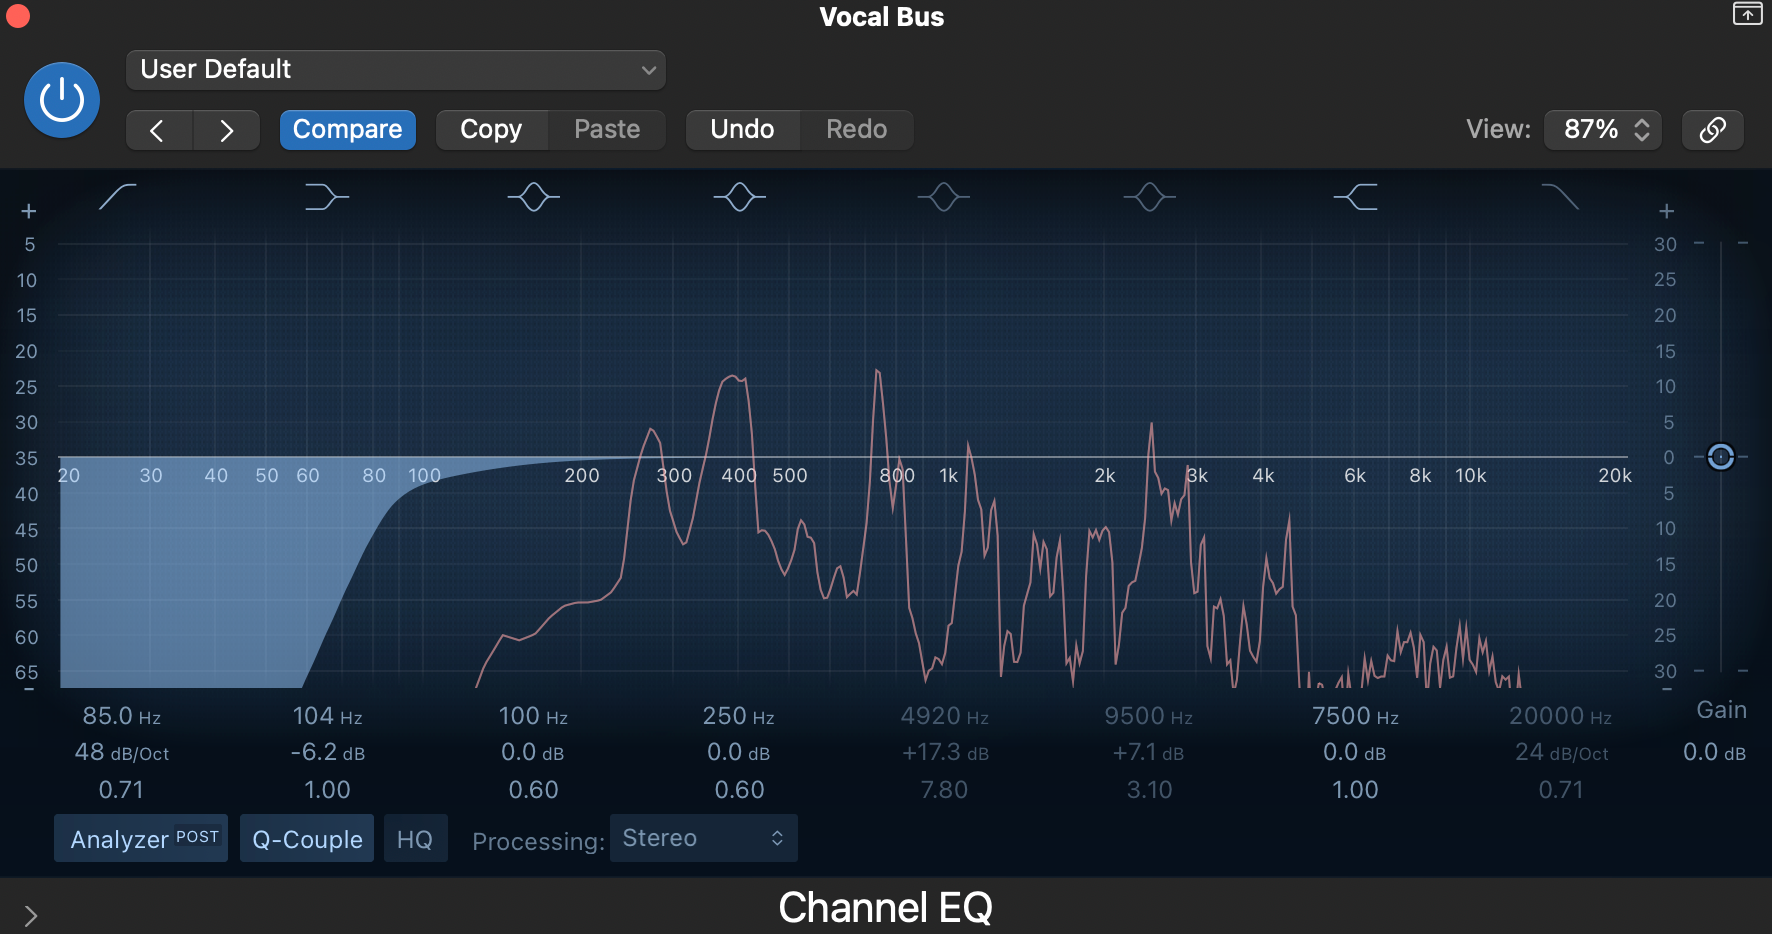
Here's a look at how we use EQ in one of our Essential Vocal Chains - available for Ableton Live and Logic Pro X
We also find that using a Channel EQ to boost the high-end of our signal is an excellent way to add "air" to our vocal mix!
Consider using a second EQ, placed after our compressor in the signal chain, to boost highs and shape the overall vocal tone.
Now that you've removed some low-end, the best next step is to balance the dynamic range of your vocals with a compressor.
Compression is vital to a professional vocal mix, and most DAWs have powerful stock compressors that we can use to lock in a balanced and clear sound.
While there are many ways to compress vocals, the key is to focus on achieving balance.
We recommend starting with a ratio around 4.00 : 1 and aiming for peak gain reduction of around -4 to -7 dB.
Most great vocal recordings have a wide dynamic range as a result of the expressive way in which they were sung.
By introducing ~ -5 dB of peak gain reduction, we're bringing the entire recording within a reasonable listening range.
Once you decide how much gain reduction you want, we recommend using the make-up gain to raise the overall level of your vocal mix in parallel.
In other words, if you've created a peak gain reduction of -3.5 dB, try boosting the make-up gain by 3.5 dB for a more balanced sound.
Nothing can ruin a vocal mix faster than super-harsh sibilant frequencies.
Sibilances are the harsh high frequencies that naturally occur when singing "s," "f," "s," "sh," and "ch" sounds.
We can use a de-esser to identify and automatically cut the overall volume of these sounds, so that our vocal performance is pleasant and full.
Here's how to identify the sibilances in your vocal performance!
We'll start by adding a band to an EQ, setting the gain of that band to maximum, and keeping the Q-factor high (so the band remains narrow).
Now, listen to your vocals (ideally a section with lots of "s" sounds), and move the frequency of our band back and forth between 3k and 20k Hz.
As you do this, you'll most likely encounter some seriously-unpleasant frequencies. These are what we'll be cutting with our de-esser!
Determine the frequency range of those most harsh sibilances, then set the frequency of your de-esser to match.
Most de-essers also have a "Threshold" function - we'll use this to determine the volume that a harsh frequency has to hit for our de-esser to kick in.
Just move the threshold around while listening to your vocal. The aim here is to reduce the sibilance without making our vocals sound dull or flat.
Generally speaking, between -3 to -10 dB of gain reduction is a solid range to aim for when de-essing.
You may have heard producers and mix engineers use the phrase "perceived loudness" when discussing their mixing process.
This refers to how full, present, and "loud" our vocal feels, regardless of its actual peak volume.
Every step of our vocal mixing process contributes to achieving a strong perceived loudness, but saturation is perhaps the most important.
Saturation, at its core, is a combination of compression and harmonic distortion. When we choose to saturate an audio signal, we're simultaneously balancing the overall dynamic range and adding new harmonic frequencies to the sound.
This will result in a fuller, more present, analog-feel to your vocal mix.
Back in the day, most analog mixing gear automatically saturated any signal recorded through it.
Vintage compressors and EQ's introduced the kind of colorful saturation that we now use tape emulation and saturation plug-ins to recreate.
While there are loads of powerful VSTs that you can use for saturation (i.e Saturn II by fabfilter, Decapitator by Soundtoys), most DAWs have incredible stock plug-ins that we can use to give pro-level saturation to our vocals.
Saturation on vocals should be applied on a case-by-case basis.
Instead of applying the same type of saturation to your vocals on every song, try auditioning different colors of saturation until you find the sound that you like most.
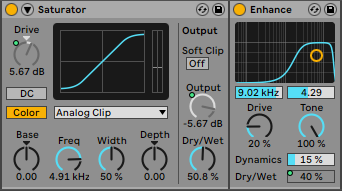
In Logic Pro X, for example, we can apply saturation using the Phat FX plug-in (pictured below).
This screenshot is taken of the settings from one of our Essential Vocal Chains
Here, we can choose up to three different colors (types) of saturation to use at once, and blend them in together.
Auditioning each of these colors at high levels, one by one and then together, will allow us to determine the sound that best fits your vocal mix.
Lastly, we can introduce personality and vibe to our sound by tastefully applying effects on our vocals.
The effects most commonly used in a professional vocal mix are reverb, delay, and chorus.
We can apply these effects directly on the channel strip, but more often than not, we'll opt to use them in parallel on a return track.
There's a whole wide world of effects to explore and experiment with, so we won't attempt to detail every one of them here.
Instead, here are a few ideas on how you can use them creatively in your vocal mix.
Reverb / Delay - consider adding your favorite reverb and/or delay to a return track, followed by an EQ and a Compressor.
Make sure that the Dry/Wet of our reverb or delay plug-in is set to 100% "Wet" when being used on a return track!
We'll use the EQ to remove a significant amount of the low-end (try 250 Hz and up), and the Compressor to sidechain the reverb back to your vocal.
To do this, just select "Sidechain" in the Compressor, then choose the audio track that our vocal signal is coming from.
This will cause the reverb to duck when the vocal is active, then swell in once the vocal signal stops, allowing us to preserve a mostly-clean vocal while still producing the spacious sound that we want from our chosen reverb or delay.
This screenshot includes presets from our Essential Vocal Chains, as well as The Everything Bundle for Logic Pro X.
Consider controlling how much of your vocal is sent to this return track with automation. That way, you can control the vibe of your vocal mix dynamically throughout the entire track.
Chorus - we love adding Chorus to a return track with the mix at 100% and subsequently sending a variety of different track elements to it throughout our song.
Oftentimes, we'll send vocals, guitars, keys, and more to the same chorus bus, allowing us to create a cohesive stereo width that can be blended into our track alongside our main instrument groups.
That sums it up for our deep dive into the five most important elements of a professional vocal mix.
Building a the right vocal chain can be a daunting undertaking, but it doesn't have to be.
Start by mastering the essentials and using your ear to determine what sounds best to you!
Related product
Vocal Chain Presets: The Essential Collection V2
$39.50